captcha验证码模块汉化包简体中文版
- 閱讀更多關於captcha验证码模块汉化包简体中文版
- 1 篇回應
- 發表回應前,請先登入或註冊
可以透過簡單的語法來插入(Insert)某個節點(Node)的內容,加上參數設定來達到想要顯示的節點標題、內容、回應、連結、網頁等等.....。
【使用方法】:
管理>網站設定>輸入格式>設定>啟動Insert node [re-renamed]選項。
1. enable insertnode module
2. modify your input format profile -> add insertnode filter
3. create your webform node (say, for example, the node id is : 150)
4. add [insert:150] wherever you want to add this webform in other nodes
【語法範例】:
[node:123] 插入節點123的所有內容。
[node:123 teaser] 只插入節點123的標題部份。
[node:123 body] 只插入節點123的內容部份。
[node:123 collapsible] 插入節點123的所有內容,並可折疊/展開,預設為展開狀態。
[node:123 collapsible collapsed] 插入節點123的所有內容,並可折疊/展開,預設為折疊狀態。
[node:123] - insert full text (themed by theme('node'))
[node:123 body] - insert node's body
[node:123 teaser] - insert node's teaser
[node:123 link] - insert link to node
[node:123 collapsed] - insert collapsed node's body
【語法完整說明】:
[node:123|* parameters] - insert a node content
themed, content, body, teaser, or page - insert the node's content themed in different ways
cck - insert a cck field, or unthemed title, teaser or body
title, link, more or edit - insert link to node with title, edit or "Read more..."
collapsed or collapsible - display the selection collapsible and eventually collapsed
created, modified - insert the date when the node was created, modified
comments - insert node comments
demote - increment (>0) or decrement (<0) the headers level
noterms - remove all the terms so as to hide them
plain - do not insert the output inside any tag
repeat - repeat the filter on the inserted content
imagefield - insert an image from a CCK field with links
booktree - insert a booktree
better formats module:2010年03月05日星期五
適用於:Drupal初學者,想更改Drupal theme外觀 的人,對CSS有興趣的人,對PHP有興趣的人,以前用Dreamweaver的人,以前用其他Blog CMS的人。本文用Drupal6.14,想在Drupal中使用Flash,詳見本文的環境。
經由Danny的介紹,知道了better formats module,謝謝Danny,better formats module功能及下載6.x-1.2在此 (我用的是6.x-1.1版),評比在此。
我最需要better formats module的功能就是去掉" format tips",什麼是" format tips"?見圖一箭頭所指框框內的一堆字,這是上drupaltaiwan.org回應的畫面,對於drupaltaiwan.org讀者可能ok,因為上drupaltaiwan.org有許多人有工程背景,看得懂HTML、syntax...等等,一般的內容網站讀者很可能會很不習慣,看一下xuite部落格回應,沒這種怪字,因此想去掉圖一箭頭所指框框內的一堆字。因而加上better formats module。
(一)如何安裝better formats module後,去掉" format tips":
(二)better formats module還有許多功能,見圖二,有collapse format fieldset by default、collapsible format selection、 show format selection for blocks、show format selection for comments、show format selection for nodes、show format tips、show more format tips。<Show format tips>及<show more format tips>已講過。其他的則和<輸入格式>(ipute format )相關, collapse format fieldset by default、collapsible format selection讓人選擇<輸入格式>(ipute format )顯示與否及是否可以全顯(collapsible);show format selection for blocks、show format selection for comments、show format selection for nodes則讓人可對block、node、comment選<輸入格式>。甚至可讓每一個角色對block、node、comment選各自的dedault<輸入格式>,這一切在安裝better formats後,Click <網站設定><輸入格式>後,注意上方有了<Defaults>(見圖三星號處),只有安裝better formats後才會有<Defaults>,Click<Defaults>,出現圖三,再針對Node defaults(圖三雙圈處)、Comment defaults(圖三雙圈處)、Block defaults(圖三雙圈處)下的不同角色設定即可。
圖一:Click <內容管理><建立內容><一般文章>後,出現FCKeditor,可以看到有許多tool,圖中箭頭所指處是<插入/編輯影像>,Click該按紐,會出現圖二。

圖二:安裝better formats後,Click <使用者管理><權限>,確定<Show format tips>未勾選即可不讓圖一箭頭所指框框內的一堆字、format tips出現 。<Show format tips>控制圖一框框內四個小圈圈後的字、<show more format tips>控制圖一框框內最下方那個"更多關於格式化選項資訊"連結。 圖三:讓每一個角色對block、node、comment選各自的dedault<輸入格式>,這一切在安裝better formats後,Click <網站設定><輸入格式>後,注意上方有了<Defaults>(見下圖星號處),只有安裝better formats後才會有<Defaults>,Click<Defaults>,出現下圖,再針對Node defaults(下圖雙圈處)、Comment defaults(下圖雙圈處)、Block defaults(下圖雙圈處)下的不同角色設定即可。。
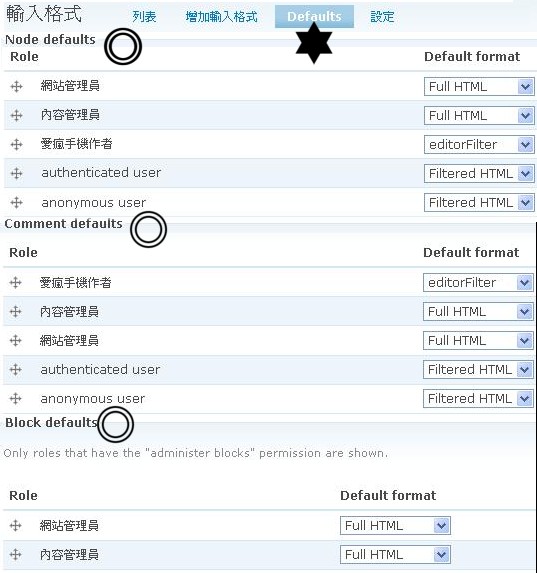
本文的環境是:
FCKeditor及IMCE的使用及安裝:2010年03月01日星期一
適用於:Drupal初學者,想更改Drupal theme外觀 的人,對CSS有興趣的人,對PHP有興趣的人,以前用Dreamweaver的人,以前用其他Blog CMS的人。本文用Drupal6.14,想在Drupal中使用Flash,詳見本文的環境。
一個內容網站不可少的是一個輸入內容的編輯器,本文介紹Drupal模組 FCKeditor及IMCE的使用及安裝(在drupaltaiwan.org已有IMCE模組介紹)。FCKeditor及IMCE的安裝是節譯自Oreilly的Using Drupal第82~89頁。FCKeditor只是個編輯器,加上IMCE這個影像/檔案上傳下載器才能產生圖文並茂的內容。可以先很快地去看一下如何上傳下載影像/檔案。
FCKeditor並非新東西,已有很多資訊,尤其是阿舍的FCKeditor安裝文章更是詳盡,但是,因FCKeditor很繁雜,加上IMCE更是令人困惑,看到Oreilly的Using Drupal第82~89頁以簡單方法安裝,十分有效率,故節譯之,一方面做個筆記,一方面以饗眾人。Drupal有些東西太多,近來覺得學Drupal應注重"不需要更改的東西",而非"東試試設定這個西試試設定那個",結果不work,找半天問題,浪費很多時間。用FCKeditor,先依本文簡易安裝成功,再試其他功能(可參考阿舍文章),由簡入繁,以免多花費時間。
(一)使用FCKeditor:
- Click<內容管理><建立內容><一般文章>後,出現FCKeditor,可以看到有許多tool,見圖一。
- 圖中箭頭所指處是<插入/編輯影像>按紐,Click該按紐,會出現圖二。
- Click 箭頭所指的<瀏覽伺服器端>,會出現圖三。注意圖三的三個星號處,上方星號處有<上傳><Thumnails><刪除><Resizes><Send to RCKEditor>五大功能,左方星號處<導覽>下方出現可以找到影像檔的資料夾,右方星號處為某個資料夾中的影像檔。如何將一個影像檔放到內容中?只需Click該影像檔名,再Click<Send to FCKEditor>即可。
見圖一,其他各個按紐均有其不同用途,將滑鼠移至按紐上即會顯示出用途。除了<插入/編輯影像>這個按紐外,再挑幾個按紐來看看:
(二)安裝FCKeditor:以下節譯自Oreilly的Using Drupal第82~89頁。
(A)安裝模組。到http://drupal.org/project/fckeditor下載fckeditor模組,到http://drupal.org/project/imce下載imce模組。需注意,下載的fckeditor模組並不包含fckeditor本尊,因為fckeditor本尊是由非Drupal社群開發的,所以需再下載fckeditor本尊,詳如下:
阿羯經驗:下載fckeditor模組6.x-2.0版(2010-Jan-31)。下載imce模組6.x-1.3版(2009-Sep-25)。
阿羯經驗:(a) 最新版已進化至2.6.6版。(b)使用drupal module FCKeditor內的link至sourceforge下載fckeditor本尊2.6.6版(FCKeditor_2.6.6.tar.gz)。
注意:若用http://www.fckeditor.net,會轉成http://ckeditor.com,再Click download後,需找FCKeditor下載,不要下載CKEditor,CKEditor和FCKEditor不同。
阿羯經驗:用7-Zip較Winzip更好抽取檔案。
(B)設定fckeditor/IMCE模組。
- Click <網站建置><模組>,Click <其他>,在FCKeditor及IMCE左方勾選<啟用>。
- Click<使用者管理><權限>中勾選相關權限如下。
- <access fckeditor> --> 匿名使用者(anonymous user)、已登入使用者(authenticated user)、編輯(editor)、網站管理者(site administrator)。
- <administer editor> --> 網站管理者(site administrator)。
- <allow fckeditor file uploads> --> 編輯(editor)、網站管理者(site administrator)。
注意:所有的角色必需勾選<access fckeditor>。
阿羯經驗:因Using Drupal書中例子是分匿名使用者(anonymous user)、已登入使用者(authenticated user)、編輯(editor)、網站管理者(site administrator)四項。故作如上設定,每個人可各自做不同設定。阿羯的設定見圖五。- 需將User 1設為網站管理者(site administrator)。設定方法:用User 1 (原始安裝Drupal時的user) 登入,Click <我的帳號 > <編輯> ,並勾選網站管理者(site administrator)角色。
- 現在設定fckeditor profile。Click<網站設定><FCKeditor>。
- 出現FCKediotr畫面,如圖六,有Default及Advanced兩個fckeditor profile。Click <Default>右的<編輯>,出現Edit FCKeditor profile畫面後作如下的修改後Click<儲存>:
- Basic setup
Roles allowed to use this profile --> 匿名使用者(anonymous user)、已登入使用者(authenticated user)。
- File browser settings
File browser type --> IMCE
- Click<網站設定><FCKeditor>到FCKediotr畫面,如圖六, Click <Advanced>右的<編輯>,出現Edit FCKeditor profile畫面後作如下的修改後Click<儲存>:
- Basic setup
Roles allowed to use this profile --> 編輯(editor)、網站管理者(site administrator)。
(去掉已登入使用者(authenticated user)的勾選)- File browser settings
File browser type --> IMCE
注意:可更改FCKeditor的tool bar 及增加tool bar 按紐(button),在sites/all/modules/fckeditor中有fckeditor.config.js檔,用vim打開後修改即可。
阿羯經驗:圖七是阿羯的Default profile設定。圖八是阿羯的Advanced profile設定。(C)調整Drupal的輸入格式(input format) 及 FCKeditor之間對HTML處理的予盾關係。FCKeditor會在不知不覺中加入HTML,而Drupal經由輸入格式(input format)的"default Filtered HTML format"設定會消除很多HTML。
- editor 用的 Advanced toolbar(見圖一)有許多按紐,可以產生各種HTML。editor toolbar給內部人士使用,例如:編輯(editor)、網站管理者(site administrator),因而輸入格式(input format) 用Full HTML filter,以便讓editor toolbar加入的所有之HTML發揮功能。
- 匿名使用者(anonymous user)、已登入使用者(authenticated user)所使用的default toolbar只加入少許HTML, 匿名使用者(anonymous user)、已登入使用者(authenticated user)並非內部人士,為了讓default toolbar加入的少許HTML可以顯現其功能,將設為"default Filtered format"的輸入格式(input format),並加入一些其他的HTML(不能設為Full HTML filter)。
- Click <網站設定><輸入格式>。
- Click <Full HTML format>右的<設定>。
- 只勾選編輯(editor)、網站管理者(site administrator)。其後Click<儲存設定>。
- 現在,editor 用的 Advanced profile可以施展其HTML功能了。接著替default profile 調整HTML,Click <網站設定><輸入格式>後,Click <Filtered HTML> 的<設定>。在"Filtered HTML"畫面中Click上方的<設定>,出現"設定Filtered HTML"畫面,往下找到<可使用約HTML標簽>(見圖九),在其下框框內加入<img> <div> <pre> <address> <h1> <h2> <h3> <h4> <h5> <h6> (HTML以空白分隔),這些HTML會讓<插入/編輯影像>按紐(見圖一第二排箭頭處)、<格式>下拉選單顯示出來(見圖一第三列左邊第一個下拉式選單)。其後Click<儲存設定>。
(D)如果,現在使用一下<插入/編輯影像>按紐,會發現必需自己輸入影像的位址(url),相當不便。為了要能瀏覽、上載、插入影像,就需要設定IMCE模組。
- Click<網站設定><IMCE>。
- 出現兩個profile ---> User-1及Sample profile,User-1 profile顯然是給User-1用的,自然可以給編輯(editor)、網站管理者(site administrator)使用,Sample profile可給一般的匿名使用者(anonymous user)、已登入使用者(authenticated user)所使用。Click User-1 profile右的<編輯>紐。
- 將Profile name改為Advanced以便和FCKeditor Advanced profile相符。雖然名稱不是一定要相同,一樣的名稱是為了好辨識。
- 將Maximum resolution改為800x600。
- Click<儲存設定>。(見圖十)
- 為了名稱的一致性,將Sample profile也改個名稱。Click<網站設定><IMCE>。出現兩個profile - User-1及Sample profile。Click Sample profile右的<編輯>紐。
- 將Profile name改為Default以便和FCKeditor default profile相符。Click<儲存設定>。(見圖十一)
- 最後,將profile和角色連結。Click<網站設定><IMCE>,將Role-profile assignment下的User Role連到Assignment profile,如下:
- 網站管理者(site administrator) --> Advanced。
- 編輯(editor) --> Advanced。
- 已登入使用者(authenticated user) --> Default。
- Click <儲存設定>。
- 現在,用<建立內容>去產生一個內容,FCKeditor toolbar就會出現。如圖一。
阿羯經驗:
必需用User-1登入,才可進入<網站設定><IMCE><User-1 profile 或Sample profile>。
見圖十一。Default profile允許上傳的延伸檔名只有幾個-->gif、png、jpg、jpeg,均為影像檔的延伸檔名,Advanced profile 允許上傳的延伸檔名為"*",代表所有的檔案均可上傳。
(E)一些阿羯的進階經驗。
- 對不同的使用者,如何設定不同的資料夾?對不同的資料夾,如何設定各自不同的瀏覽(Browse)、上傳(Upload)、Thumbnails、刪除、Resize選項?
- 答:Click <網站設定><IMCE>,再Click某一個profile右的<編輯>,找到Directories,其下有Diretory path、 Browse、上傳、Thumbnaisl、刪除、Resize五項可以修改。共可放五個Diretory path。見圖十二。
阿羯經驗:注意users/user%uid,這個寫法會自動將%uid換成登入使用者id,例如登入使用者id為5,則users/user%uid成為users/user5,如此可自動讓不同的使用者使用不同的資料夾。
- 如何增加FCKeditor的profile?
- 答:Click <網站設定><FCKeditor>,在<個人資訊>下Click <Create new profile>。見圖十三,除了原有的Advance、Default profile外,另產生了editor、authentic profile,共有四個profile。
如何增加IMCE的profile? 如何更改圖十二中Directories下directory path前的檔案系統路徑---sites/default/files?
- 答:Click<網站設定><檔案系統>。更改檔案系統路徑。
如何讓不同使用者有不同的FCKeditor toolbar?
- 答: Click <網站設定><FCKeditor>,在<個人資訊>下Click某個profile右的<編輯>,出現"Edit FCKeditor profile"畫面,找到<Editor appearance> 下的<Toolbar>下拉選單,共有Basic、Default、DrupalBasic、DrupalFiltered、DrupalFull五種toolbar。選擇時需注意該profile的HTML能力。見圖十五。
如何讓FCKeditor的螢幕跳出?
- 答: Click <網站設定><FCKeditor>,在<個人資訊>下Click某個profile右的<編輯>,出現"Edit FCKeditor profile"畫面,找到<Editor appearance> ,設定其下的<Default state> -->停用,<Show disable/enable rich text editor toggle> --> Hide,<Use FCKeditor in a pop up window> --> 是。見圖十六。 FCKeditor的螢幕跳出不好用!避免使用。
如何對不同的使用者,產生不同的資料夾?
- 答:Click <網站設定><IMCE><Directory creation tool>,在Directory path下,例如:若是user id 1,鍵入users/user1即可。
圖一:Click <內容管理><建立內容><一般文章>後,出現FCKeditor,可以看到有許多tool,圖中箭頭所指處是<插入/編輯影像>,Click該按紐,會出現圖二。
其他各個按紐均有其不同用途,將滑鼠移至按紐上即會顯示出用途。除了<插入/編輯影像>這個按紐外,再挑幾個按紐來看看:
第一排<原始碼>按紐:Click後會顯示html原始碼。如果不知"html原始碼"是什麼意思也不要緊,因為這正是FCKeditor的用處--讓不懂"html原始碼"的人也可以製作網頁。
第二排由左算起第四個按紐,<插入/編輯超連結>。
第三排最右的按紐是<顯示區塊>。
 圖二:Click 箭頭所指的<瀏覽伺服器端>,會出現圖三。
 圖三:注意三個星號處,上方星號處有<上傳><Thumnails><刪除><Resizes><Send to RCKEditor>五大功能,左方星號處<導覽>下方出現可以找到影像檔的資料夾,右方星號處為某個資料夾中的影像檔。如何將一個影像檔放到內容中?只需Click該影像檔名,再Click<Send to FCKEditor>即可。
 圖四:將http://drupal.org/project/fckeditor下載的fckeditor模組及http://drupal.org/project/imce下載的imce模組抽取出來後,放在sites/all/modules,再將(3.)的fckeditor 資料夾放到sites/all/modules/fckeditor 資料夾內去蓋掉其中原有的fckeditor 資料夾,檢查一下,如果有sites/all/modules/fckeditor/fckeditor/fckeditor.php檔,就對了。見兩個星號處。
 圖五:Click<使用者管理><權限>中勾選相關權限,Using Drupal書中例子是分匿名使用者(anonymous user)、已登入使用者(authenticated user)、編輯(editor)、網站管理者(site administrator)四項。故作如上設定,每個人可各自做不同設定。以下是阿羯網站的設定。
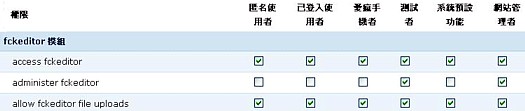 圖六:Click<網站設定><FCKeditor>,出現FCKediotr畫面,有Default及Advanced兩個fckeditor profile。Click <Default>右的<編輯>,出現Edit FCKeditor profile如圖七。
 圖七:阿羯的Default profile設定。Click <Default>右的<編輯>,出現Edit FCKeditor profile畫面後,修改Profile name為Default及Roles allowed to use this profile及File browser type後,Click<儲存>。
 圖八:阿羯的Advanced profile設定。出現Edit FCKeditor profile畫面後,修改Profile name為Adanced及Roles allowed to use this profile及File browser type後,Click<儲存>。
 圖九:Click <網站設定><輸入格式>後,Click <Filtered HTML> 的<設定>。在"Filtered HTML"畫面中Click上方的<設定>,出現"設定Filtered HTML"畫面,往下找到<可使用約HTML標簽>(如下圖),在其下框框內加入<img> <div> <pre> <address> <h1> <h2> <h3> <h4> <h5> <h6> (HTML以空白分隔),這些HTML會讓<插入/編輯影像>按紐(見圖一第二排箭頭處)、<格式>下拉選單顯示出來(見圖一第三列左邊第一個下拉式選單)。其後Click<儲存設定>。
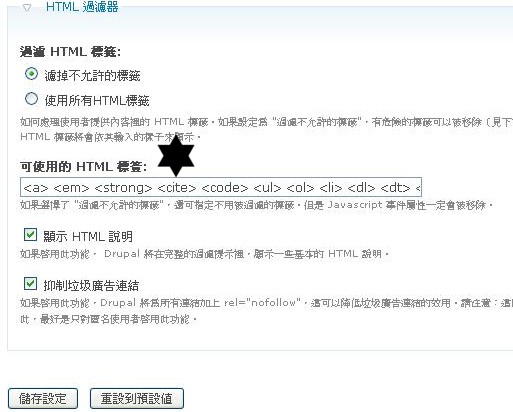 圖十:Click<網站設定><IMCE>。Click User-1 profile右的<編輯>紐,將Profile name改為Advanced以便和FCKeditor Advanced profile相符。雖然名稱不是一定要相同,名稱一樣是為了好辨識。將Maximum resolution改為800x600。
 圖十一:Click<網站設定><IMCE>。Click Sample profile右的<編輯>紐,將Profile name改為Default以便和FCKeditor Advanced profile相符。雖然名稱不是一定要相同,名稱一樣是為了好辨識。
 圖十二:Click <網站設定><IMCE>,再Click某一個profile右的<編輯>,找到Directories,其下有Diretory path、 Browse、上傳、Thumbnaisl、刪除、Resize五項可以修改。共可放五個Diretory path。
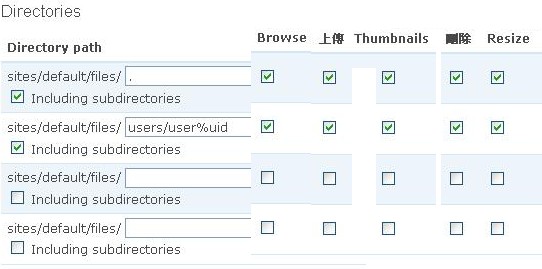 圖十三:Click <網站設定><FCKeditor>,在<個人資訊>下Click <Create new profile>。見下圖,除了原有的Advance、Default profile外,另產生了editor、authentic profile,共有四個profile。
 圖十四:Click <網站設定><IMCE>,在<Configuration Profile >下Click <Add new profile>。見下圖,除了原有的Advance、Default profile外,另產生了editor、authentic profile,共有四個profile。下圖下方將同的角色指定不同的profile。
 圖十五:Click <網站設定><FCKeditor>,在<個人資訊>下Click某個profile右的<編輯>,出現"Edit FCKeditor profile"畫面,找到<Editor appearance> 下的<Toolbar>下拉選單,共有Basic、Default、DrupalBasic、DrupalFiltered、DrupalFull五種toolbar。選擇時需注意該profile的HTML能力。
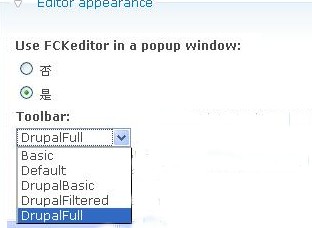 圖十六:Click <網站設定><FCKeditor>,在<個人資訊>下Click某個profile右的<編輯>,出現"Edit FCKeditor profile"畫面,找到<Editor appearance> ,設定其下的<Default state> -->停用,<Show disable/enable rich text editor toggle> --> Hide,<Use FCKeditor in a pop up window> --> 是。見下圖。 FCKeditor的螢幕跳出不好用!避免使用。
 [附錄]其它FCKeditor + IMCE 或TinyIMCE、及相關的使用及安裝資訊:
drupal.org下載FCKeditor解壓縮後,可用wordpad或vim打開site/all/modules/fckeditor/readme.txt,有詳盡的FCKeditor安裝資訊(含加個按紐)。
在drupaltaiwan.org搜尋fckeditor,結果在此:搜尋後未見有人介紹過FCKeditor模組。
阿舍有關fckeditor安裝文章:part1、part2、part3、part4。十分詳細的好文。
fckeditor和Whyzziwig比較:本文指出FCKeditor的兩大障礙-太大及不能由一般使用者自建資料夾,因而有人轉用whizzywig。
whizzywig上,whizzywig下。senkao介紹whizzywig的好文,同時也指出為何要改用whizzywig。
FCKeditor有經驗使用者:senkao。
這個模組讓你可以將段落中的文字收合展開 (需到輸入格式中將Collapse text啟用)
使用[collapse] and [/collapse]標籤
如:
This is some text.
[collapse]
This is some more text.
[/collapse]
覺得這個編輯器管理很好用~分享給大家~第一次寫這設置步驟
請大家多多指教
設置步驟:
(1)將Wysiwyg模組放置於site/all/modules中。
(2)然後到網站建置去啟用Wysiwyg模組。
(3)Go to 管理Administer > 網站設定Site configuration > Wysiwyg, and
follow the displayed。
(4)依據所需下載網頁編輯套件,點選(Download)即可連至官方網站下載。
(5)並於site/all/中設置一資料夾名為(libraries),將所下載的網頁編輯套件
放置裡面即可設置成功。
(6)相關細項設定依據所需調整即可。
增加『內容管理』>>『內容』裡面的過濾選項
* 可顯示節點與回應
* 可過濾作者(下拉清單)
* 可過濾作者(AJAX)
* 可過濾role
* 可過濾使用者狀態(啟用或block)
* 可過濾標題或內容字串
* 可過濾節點建立日期(之前/之後)
* 可過濾節點的語言
* 清單新增節點建立日期的欄位
* 清單可有多種排序: 標題, 類型, 作者, 狀態, 建立時間
Wysiwyg API允許使用客戶端的編輯器(又名所見即所得的編輯器)來編輯內容。它簡化了編輯器的安裝和允許您定義編輯器根據輸入格式。
像drupal的tinymce模組網頁上就說
This module has been replaced by Wysiwyg API, which (also) integrates the TinyMCE editor with your Drupal site and provides the same functionality. Most (if not all) users should install or migrate to Wysiwyg API instead.
目前有支援的編輯器有 FCKeditor 2.6, jWYSIWYG 0.5, markItUp 1.1.5, NicEdit 0.9.0, TinyMCE 3, TinyMCE 2, Whizzywig 55
一款輕量級的所見即所得編輯器,它默認是遠程調用官方JS文件,使得可隨時保持最新狀態,當然你也可以將它存放到自己的網站上。
提供自訂過濾器的功能
不需要再為了新增過濾器而建立新的模組
過濾器的設定可以使用正規表示式來過濾需要替換的字串
替換的字串甚至可以設定使用 php 來進行更複雜的處理
建立的過濾器會出現在 輸入格式 的設定內以供勾選
一套符合標準的 HTML 過濾器,不只可以移除惡意的程式碼(XSS),還可以讓你的內容符合網頁標準。
這個模組的基本功能和 External Links是一樣的, 只是他是使用 CSS, 而且是使用 Drupal filter, 而不是使用 Java Script. 作者在這篇文章中有提到比之 External Links 有什麼好處:
http://tedserbinski.com/2008/01/26/new-external-links-filter-drupal
ps: 我沒有都翻譯出來, 請看原文會比較清楚
不過目前只有 D5, 而 External Links 有 D6 的版本.
提供多種過濾器,可支援以下的輸入語法,並可與多個 wiki 相關的模組合併使用:
* Mediawiki
* TikiWiki
* DokuWiki
* Creole
* BBCode